Editing Color Adjustments controls
You can use the Color Adjustments controls in the Inspector  to perform color grading that is applied globally to all clips. If you want to save your color-correction settings, you can transcode clips to create new files. For more information, see "Saving and sharing clips."
Color adjustments are not available when Catalyst Browse is started in view-only mode.
Loading a clip/clip list for color adjustments and configuring the waveform, histogram, and vectorscope monitors
-
Click the Browse button at the top of the Catalyst Browse window to view the Media Browser.
-
Perform any of the following actions to display the Adjust color workspace:
-
Select a clip in the Browse pane, and click the Adjust color button
 at the bottom of the Catalyst Browse window.When the Catalyst Browse window is resized, the Adjust color, Correct lens breathing
  , and Stabilize clip
  buttons are available in the Adjustments menu
  .
. -
Right-click the image in the Browse pane and choose Adjust color from the shortcut menu.
-
Double-click a clip
In the Adjust Color workspace, Catalyst Browse displays a waveform/histogram/vectorscope monitor, a video preview, and color controls that you can use to adjust the appearance of your video.
-
-
The waveform/histogram/vectorscope monitor and video preview window allow you to monitor your adjustments as you edit color values.
The Preview color space setting in Options is also applied to the waveform, histogram, and vectorscope so you can to check your video using scopes. For more information, see "Editing Catalyst Browse options."
-
Click the Waveform button
 at the bottom of the window to toggle the waveform monitor.
The waveform monitor displays the luminance values (brightness or Y component) of your video signal. The monitor plots luminance values on the vertical axis and the width of the current frame on the horizontal axis.
You can use the buttons at the top of the waveform monitor to display overlaid (
 ) or separate (
 ) RGB waveforms and isolate colors
  .
.Waveform settings
Click the Settings button
 to open the Waveform Settings menu. You can use the Waveform Settings menu to change the scale of the waveform monitor and enable AIR matching when grading HDR clips.
The Settings button
is available only when the Working color space drop-down is set to Rec-2020/S-Log3 (HDR) and the Preview color space drop-down is set to Rec.2020/S-Log3, Rec.2020/HLG, Rec.2020/HLG AIR Matching, Rec.2020/HLG (bypass OOTF), Rec.2020/PQ, Rec.2020/PQ AIR Matching, or Rec.2020/PQ (bypass OOTF).For more information, see "Color management settings" or "Editing Catalyst Browse options."
You can click the % or Nits button to change the units displayed in the waveform.
When the Preview color space is set to Rec.2020/HLG, Rec.2020/HLG AIR Matching, or Rec.2020/HLG (bypass OOTF), the Nits value is calculated for a peak luminance of 1000 cd/m2.
When the Preview color space drop-down is set to Rec.2020/S-Log3, you can use the AIR Matching switch to toggle AIR (Artistic Intent Rendering) matching to achieve a consistent look between Rec.2020/S-Log3-based grading and a configured HLG (hybrid log-gamma) or PQ (perceptual quantizer) monitor.
The AIR Matching switch is automatically turned on when the Preview color space drop-down is set to Rec.2020/HLG AIR Matching or Rec.2020/PQ AIR Matching.
-
Click the Histogram button
 at the bottom of the window to toggle the histogram monitor.
The histogram monitor displays the number of pixels that exist for each color intensity. The vertical axis represents the number of pixels, and the horizontal axis represents the RGB color range from 0 to 255.
You can use the buttons at the top of the histogram monitor to display overlaid (
) or separate () RGB histograms and isolate colors  .
. -
Click the Vectorscope button
 at the bottom of the window to toggle the vectorscope monitor.
The vectorscope monitor allows you to monitor the chroma values (color content) of your video signal. The monitor plots hue and saturation on a color wheel.
The vectorscope displays targets for broadcast-legal saturations of red (R), magenta (Mg), blue (B), cyan (Cy), green (G), and yellow (Yl). Individual colors in your video signal are displayed as dots in the vectorscope. A dot's distance from the center of the scope represents its saturation, and the angle of the line from the dot to the center of the scope represents its hue.
For example, if an image has a blue cast, the distribution of dots in the vectorscope will be concentrated toward the blue portion of the color wheel. If the image includes out-of-range blue values, the vectorscope display will extend beyond the blue target.
You can use the vectorscope to calibrate color between scenes. Without calibration, you may see noticeable color differences between scenes from multicamera shoots.
Click the Settings button
to open the Vectorscope Settings menu.The Vectorscope Settings menu allows you to toggle a monochrome view of the scope, change the scale of the scope, adjust the brightness of the colors displayed in the scope, and adjust the brightness of the scope's guide (graticule).
Use the 75% Scale setting when your source media uses 75% color bars, or use the 100% setting your source media uses 100% color bars.
-
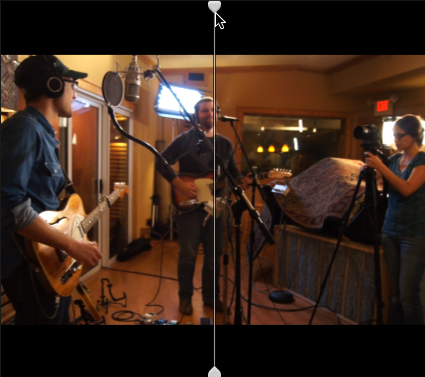
The video preview window displays the current frame at the playback position indicator.
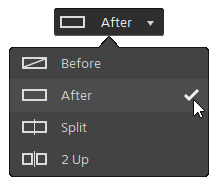
Click the Preview button in the top-right corner of the video preview to choose a preview mode. Split-screen previews allow you to split the video preview and waveform/histogram/vectorscope monitor so you can see your affected and unaffected video at the same time.
-
 Before: full-frame video is displayed in its original state.
 -
 After: full-frame video is displayed in its color-corrected state.
 -
 Split: a single frame is displayed in a split-screen view with the original video on the left and the color-corrected video on the right.
If you want to move the split location, hover over the preview frame. When the split point is displayed, you can drag the handles at the top of bottom of the screen to adjust where the preview is split:
-
 2 Up: two full frames are displayed in a split-screen view with the original video on the left and the color-corrected video on the right.
-
Adjusting the color wheels
In the Adjust Color workspace, the bottom of the Catalyst Browse window provides color wheels for Lift, Gamma, and Gain. The wheels provide a visual representation of the current adjustments and allow you to adjust color quickly. As you adjust the controls, the waveform/histogram/vectorscope monitor and video preview will update in real time to allow you to check your adjustments.
The color wheels are used to edit ASC-CDL (American Society of Cinematographers Color Decision List) parameters.
Click the Wheels button  to show or hide the color wheels.
Drag the point in the center of the color wheel to pick the hue and saturation you want to add to the video, or drag the slider on the side of the color wheel to increase luminance for all RGB components simultaneously. You can double-click the point to reset the color wheel or double-click the slider handle to reset the luminance.
You can also adjust color wheels with a Tangent control. For more information, see "Using a Tangent control."
When you drag the color correction controls, they move in fine increments. To move controls in larger increments, hold Shift while dragging.
Choosing a color space
Click the Inspector button in the toolbar to display the Inspector pane if it isn't already visible. In the Adjust Color workspace, the Color Space section in the Inspector pane provides color space controls that you can use to choose the source and conversion color spaces.
If the selected color space is not compatible with the source color space and cannot be exported, a warning is displayed to notify you.
Choosing a source color space
Click the Unlock button  and choose a setting from the Source drop-down list to choose the color space that should be applied to the source media. When you choose a setting, the video preview is updated. The source color space should be detected automatically and does not need to be changed in most cases.
The Unlock button is not used when editing RAW or X-OCN video.
Click the Reset button  at the bottom of the Inspector pane to reset the Source color space based on the clip's metadata.
Converting between HDR/wide color gamut color spaces
When an HDR or wide color gamut color space is selected in the Source drop-down list, you can choose a different HDR/WCG color space from the Convert to drop-down list to apply grading in the selected color space or apply a look profile that is available in the selected color space.
Furthermore, when the source is [S-Gamut/S-Log2], selecting [Convert to] > [709(800)] allows you to convert HDR/WCG clips to Rec.709 as well. The [709(800)] setting applies a 1D curve. When using a 3D LUT to transform HDR/WCG clips, it is necessary to apply a look profile.
The Convert to drop-down is available only when the Working color space setting is Rec.709, Log, or ACES and you're working with S-Gamut, RAW, and X-OCN source media.
For more information, see "Applying a look profile," "Grading with hypergamma conversion,"or "High Dynamic Range (HDR) color grading."
Viewing the working color space
The Working box displays the color space that will be used for color grading. Click the Options  button and choose a setting from the Working color space drop-down list to change the setting.
Viewing the color space for the video preview
The Preview box displays the color space that will be used for the Catalyst Browse video preview window. Click the Options button and choose a setting from the Preview color space drop-down list to change the setting.
Viewing the color space for the external monitor
If an external monitor is enabled, the External monitor box displays the color space that will be used for the external monitor. Click the Options button and choose a setting from the External monitor color space drop-down list to change the setting.
If a second external monitor is connected, it will use the Preview color space.
Adjusting exposure, temperature, and tint
Click the Inspector button in the toolbar to display the Inspector pane if it isn't already visible. In the Adjust Color workspace, the Source Settings section in the Inspector pane provides the Exposure, Temperature, and Tint sliders to adjust the color content of your clip.
Exposure, temperature, and tint are not available for all color spaces.
Exposure Index (EI)
When clip with a supported source color space is selected, the EI mode controls are displayed. Click an EI mode button to choose how you want to apply exposure index settings:
Files that include EI metadata display the EI on the File tab of the Inspector pane.
| Mode | Description |
|---|---|
|
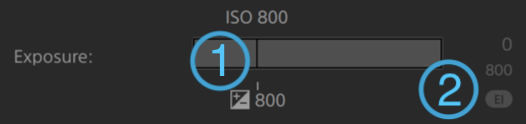
Metadata |
Choose Metadata to automatically apply exposure metadata based on camera settings. The Exposure bar (1) and EI indicator (2) display the EI value. This mode is selected by default when you choose a clip with EI metadata.
The ISO and EI values display the current frame values when playback is stopped. |
|
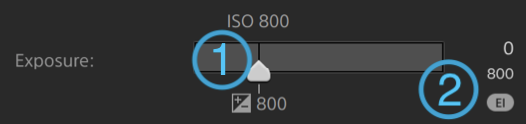
Manual |
Choose Manual to adjust exposure manually. This mode is selected by default when you choose an HDR clip that does not include supported EI metadata. The Exposure slider (1) will show the EI metadata value of the current frame as a black line, and an EI indicator (2) is displayed below the current value. Drag the slider to adjust the overall brightness of your video (a fixed value is applied to all frames).
|
|
Off |
Choose Off to turn off exposure adjustment. The adjustment slider and exposure values are not displayed, and the original sensitivity is used. |
Temperature
Drag the Temperature slider to adjust the color temperature (in Kelvin) of your video. Adjusting the temperature modifies the red and blue gain by adding an offset to the temperature setting saved in a clip's metadata.
If your camera does not store color temperature metadata, Catalyst Browse will use a default setting of 3200K.
Tint
Drag the Tint slider to adjust color balance of your video. Adjusting the tint allows you to modify the magenta and green gain to supplement the color temperature.
Double-click a control to reset its value.
Applying a look profile
You can use the Look controls to apply a look profile/LUT to an HDR clip when the Working color space setting is Rec.709 or Log.
Click the Inspector button in the toolbar to display the Inspector pane if it isn't already visible. In the Adjust Color workspace, the Look section in the Inspector pane contains controls to apply a LUT automatically based on metadata, manually, or to turn off LUT processing.
For information about adding custom look profiles, see Manual mode in the following table.
Click a LUT mode button to choose how you want to apply a look:
Click the Reset button at the bottom of the Inspector pane to reset the Look profile based on the clip's metadata.
Adjusting the tone curve
Click the Inspector button in the toolbar to display the Inspector pane if it isn't already visible. In the Adjust Color workspace, the Tone Curve section in the Inspector pane contains a color curve you can use to adjust the red, green, and blue channels graphically. As you adjust the controls, the waveform/histogram/vectorscope monitor and video preview will update in real time to allow you to check your adjustments.
-
Select the channel you want to adjust by clicking the Red, Green, or Blue button below the color curve
, or click the White button to adjust all RGB components simultaneously. -
Click the curve to add a control point.
-
Select a control point and drag it to adjust it.
-
As you adjust the controls, the waveform/histogram/vectorscope monitor and video preview will update in real time to allow you to check your adjustments. Click Delete Point
 to remove the selected control point.
 -
Click the Reset button
at the bottom of the Inspector pane to remove all control points.
Adjusting the color correction sliders
Click the Inspector button in the toolbar to display the Inspector pane if it isn't already visible. In the Adjust Color workspace, the Color Correction section in the Inspector pane provides Brightness, Contrast, Saturation, Lift, Gamma, and Gain sliders you can use to adjust video levels. As you adjust the controls, the waveform/histogram/vectorscope monitor and video preview will update in real time to allow you to check your adjustments.
The sliders are used to edit ASC-CDL (American Society of Cinematographers Color Decision List) parameters.
Drag the Brightness slider to adjust the overall lightness of your video.
Drag the Contrast slider to adjust the overall contrast of your video.
Brightness and contrast are not saved explicitly with ASC-CDL files. When exporting an ASC-CDL file, the Brightness and Contrast settings are incorporated with the other color-correction values. When you reload an exported ASC-CDL file, the Brightness and Contrast settings will be set to 0.
When exchanging color settings with Catalyst Browse and Catalyst Prepare, click the Tools button  at the bottom of the Catalyst Browse window and choose Save preset from the menu to preserve Brightness and Contrast settings.
For more information, see "Exporting color-correction settings" and "Applying color-correction settings."
Drag the Saturation slider to adjust the overall intensity of the color in your video.
To adjust lift, gamma, and gain, drag the R, G, B sliders to adjust the red, green, and blue components of the each parameter, or drag the Y slider to adjust luminance for all RGB components simultaneously.
Double-click a control to reset its value.
Click the Undo  and Redo
  buttons to step forward or backward through your recent edits.
Click the Reset button at the bottom of the Inspector pane to reset all color correction.