Viewing and editing metadata
When you're in Organize or Edit mode, click the Inspector button  in the toolbar to display metadata for the currently selected file in the Inspector pane.
Click the Summary tab to view summary information associated with the file
Click the File tab to view details about the source media and its metadata, including GPS information (if present).
When a file contains GPS metadata, you can click the Latitude and Longitude values to display a map using the map service selected in the Open GPS links with drop-down list in the Options menu. Links are not available when multiple clips are selected.
Click the Mark Points tab to view essence marks embedded in the file.
If the current file contains essence marks, they will be displayed on the timeline as a diamond  .
.
If the current clip contains discontinuous timecode, an indicator is displayed in the timeline to identify the discontinuity:
When Catalyst creates new non-realtime (NRT) metadata during MXF copy operations, metadata for discontinuous timecode and essence marks is created.
New non-realtime metadata is not created when the source clip contains NRT metadata.
Setting the frame rate for a DPX or OpenEXR image sequence
-
Select a DPX or OpenEXR image sequence in the Media Browser.
-
Click the Summary tab.
-
Choose a value from the Frame rate drop-down list boxes to set the frame rate for playing the selected image sequence.
Editing mark in/out points
Click the Summary tab.
Type new values in the Mark in and Mark out boxes to edit the clip's mark in and mark out points. For more information, see "Marking in and out points for playback."
If you want to save mark in and mark out points with the library, clear the Synchronize mark points with file check box.
When the Synchronize mark points with file check box is cleared, mark in and mark out points for MXF clips are saved back to the source media when you edit them in Catalyst Prepare, and your library will be updated if the mark in and out points are edited on disk.
Editing summary metadata
-
Click the Summary tab.
Click the Unlock button
 to enable editing summary information for the selected files.
 -
In the Logging section of the Summary tab, edit the Flag, Title, Creator, and Description settings as needed.
When editing metadata for multiple selected files, (multiple values) is displayed if the files' metadata does not match. Editing the value will replace the metadata for all selected files.
-
Click Save
 to save the edited metadata values, or click Revert
  to discard your edits.
Not all media formats support summary metadata.
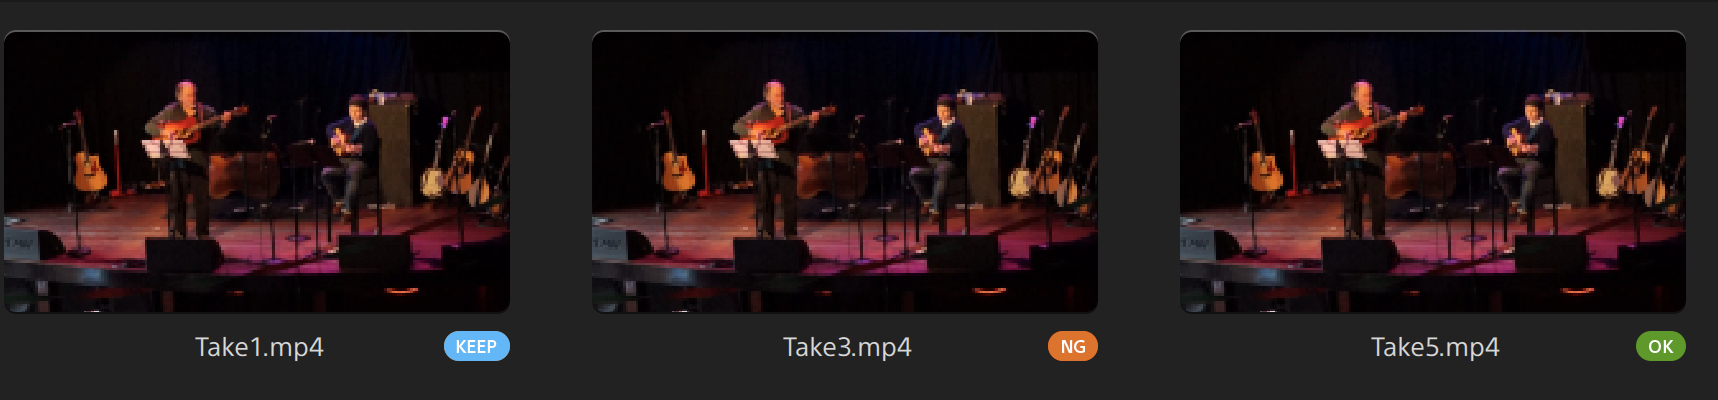
When a clip has Flag metadata, an OK, NG (no good), or Keep indicator is displayed in Organize mode:
You can also use Flag metadata to filter the contents of the Media Browser. For more information, see " Filtering clips."
Assigning audio channels
Assigning audio channels allows you to set up your clips for use in Catalyst Edit.
The Channel Assignment controls are not editable when multiple files with differing channel counts are selected.
Channel Assignment controls are not available when no library is opened. For more information, see "Closing the library."
Channel Assignment controls are not available when a spanned clip  is selected.
Channel Assignment controls are not available when editing a storyboard.
Click the speaker icon to turn a channel on  or off
  .
.
Click the Mono/Stereo button to indicate whether a channel is a mono channel or part of a stereo pair. Enabling Stereo will pair the channel with the next channel in the list.
Type a name in the edit box to identify the channel. For example, you might type Lav1 to identify audio from a lavalier microphone.
If you want to save the current channel configuration as a preset, click the Channel Tools icon  and choose Save preset from the menu.
If you want to apply a preset channel configuration to the selected file, as a preset, click the Channel Tools icon and choose Load preset from the menu.
If you want to copy channel assignments between files, select the source file, click the Channel Tools icon , and choose Copy from the menu. Next, select the destination files, click the Channel Tools icon , and choose Paste from the menu.
If you want to set all of a clip's channels at once, click the Channel Tools button and choose Set all to mono, Set all to stereo, or Reset.
Editing essence marks
-
Select a clip to display its metadata.
-
Click the Mark Points tab.
-
Click an essence mark's label or timecode value to type a new value.
Adding and editing essence marks is supported only for clips with non-realtime (NRT) metadata and requires write access to the volume.
Editing essence marks is not available when FTP-based clips are selected.
Adding a mark point
-
Select a clip to display its metadata.
-
Click the Mark Points tab.
-
Click the trackbar below the video preview to set the cursor position where you want to add a mark point(or click the timecode display to move the cursor to a specific location).
-
Click the Add Point button or press E.
Adding and editing essence marks is supported only for clips with non-realtime (NRT) metadata and requires write access to the volume.
Deleting a mark point
-
Select a clip to display its metadata.
-
Click the Mark Points tab.
-
Click an essence mark's label or timecode to select it.
-
Click the Delete button

The Delete command is not available when FTP-based clips are selected.